It never ceases to amaze me how seemingly intractable problems can be so troublesome on one day and essentially resolve themselves in a flash the next.
Yesterday, in addition to offering up nearly 2,800 words on the subject of my adventures with murderous aquatic pets, I also spent a significant amount of time (perhaps three and a half precious vacation-day hours) trying to batter it into Microsoft Outlook’s electronic brain that I would like it very much if it would perform its designated function and actually pick up my freaking email for me. The problem arose when Spouse and I departed our previous residence for the friendly environs of Juniorvania; in this particular section of the province, there is currently no one offering cable internet access, so our choices for broadband internet access were relatively limited: we had to choose the one that rhymes with “Bell Sympatico”. No, wait, that’s not a rhyme, that’s the name. Dammit.
Because Bell is incapable of correctly performing, on the first attempt, even the most modestly difficult customer service task (such as “signing up a new customer”), and because their incompetence in this regard seemed to be the straw that was breaking the camel’s back (or, more accurately, asploding this particular camel’s brain), Spouse ended up taking over the task of enlisting us in Ma Bell’s Internet army. The account, therefore, was in her name. To the victor go the spoils, and Spouse’s prize for her perserverance in the face of ridiculous stupidity was assignment of the initial email address associated with the account. The Sympatico service actually comes with a complement of 9 additional mailboxes, but the user is responsible for setting those up once the physical service is attached. I consider myself somewhat technically proficient but I have to confess that I was not able to meet the challenge, initially, of wading through the Sympatico propaganda to learn the arcana associated with this minor task – getting myself an email address.
The point is that, from the moment we moved here, I have been without an email account associated with an actual ISP; the email address I’ve been using is junior (at) heroesinrehab.ca. That email address has served me well, though it has raised a few eyebrows here and there; I remember applying for things like a mortgage and homeowner’s insurance when we bought the house and having to explain to the nice people involved in making all of these decisions that would profoundly affect my life that just because I have an email address that mentions the word “rehab”, it doesn’t necessarily mean that I am a booze-addled, drug-addicted gambler hell-bent on destroying their careful investment.
The main difficulty with relying on that email address was that I had to retrieve my email, and send my own correspondence using the email interface native to my webhost’s server. That interface is not so bad once you get used to it, but using it is nowhere near as convenient as opening an email client – such as Microsoft Outlook – and relying on the dedicated software to do the grunt work for you. I didn’t know how to configure Outlook to fetch the mail from the webmail server. Part of the problem was that my webhost did not (and does not) permit SMTP (simple mail transfer protocol) access to the mail accounts that accompany the domain, which means that I had no external access to the webhost’s outgoing mail robots. In practical terms, it meant that although I might be able to collect my email using Outlook, I couldn’t use Outlook to compose and send an email to anyone. Ougoing messages (including replies to correspondence I received) would have to be composed and sent using the host’s decent, but somewhat clunky, webmail interface.
The end result is that I simply wasn’t using Outlook at all. Every time I wanted to check or send an email, I logged into the heroes domain mail server via Internet Explorer or Firefox and did what I had to do using the interface.
Yesterday, as I was putzing around on the Digital Overlord, my extremely expensive copy of Microsoft Outlook 2003 (purchased after much deliberation and consternation because it would mesh well with the email/scheduling software we use at work (an enterprise version of Outlook) called out to me and started making fun of my skillz. Outlook wanted to get back in the game, and it was willing to call me names to get my competitive fires burning.
When you configure an email account in Outlook, you have to give the software some information about two things: where to get incoming mail (i.e. the name of the POP3 or incoming mail server) and what robot to use to send email out (i.e. the SMTP mail server). Solving the first part of the problem was easy; in the section about configuring email client software, my webhost’s online documentation gave me the name of the mail server to enter in the POP3 box. The next part of the problem is where it got tricky: the documentation was quite clear that users of these accounts were expected to have access to their ISP’s SMTP server. Let me try that again in English, without all the acronyms and techno-ese: the company that owns and operates the servers, the computers where this site lives, reason (mostly correctly, except for folks who only have Internet access at work) that anybody who is trying to use the email accounts that live on that same server will have to get access to the Internet somewhere – through an Internet Service Provider (that’s the company that sells you the connection to the ‘Net). My webhosts go on to reason that anyone who has an ISP has been issued an email account by the service provider and – here’s the important part – has been thereby granted access to the ISP’s outgoing mail (a.k.a. SMTP) server. The documentation told me, therefore, to put the name of my ISP’s ougoing mail server in the “Outgoing mail server” box when configuring Outlook.
Of course, I couldn’t do that yet; I didn’t have access to my ISP’s mail servers because (as discussed above) I never bothered to puzzle through Bell’s manuals and/or website to figure out how to do it. I’ll save you the hassle of finding it, if you’re trying to create a Bell Sympatico email address: just follow the directions at this site. I managed to successfully complete the process yesterday afternoon.
I went on to try and complete my ultimate objective: configuration of the Outlook software. it wasn’t working. I will spare you the details of the various and sundry efforts I made in this regard, but suffice to say that I was basically banging my head against the wall for three and a half hours. I was able to convince Outlook to collect the mail from my webmail account – which it did. I almost choked when I returned to the computer after going off to make a cup of tea and saw the little message, “You have 252 email messages.”
The bottom line is that by the late afternoon, I was going cross-eyed and beginning to feel that special frustration that seems to only settle over me when a Microsoft product is involved. I also had a casserole to make (the life of a house-husband is a difficult one), so I essentially surrendered, signed off the computer and headed off to the local Foodland to puzzle out the mysteries of pearl barley instead.
When I signed on this morning, I thought I’d give it one more shot at configuring my Outlook. Within a few minutes, I had a eureka moment and achieved success.
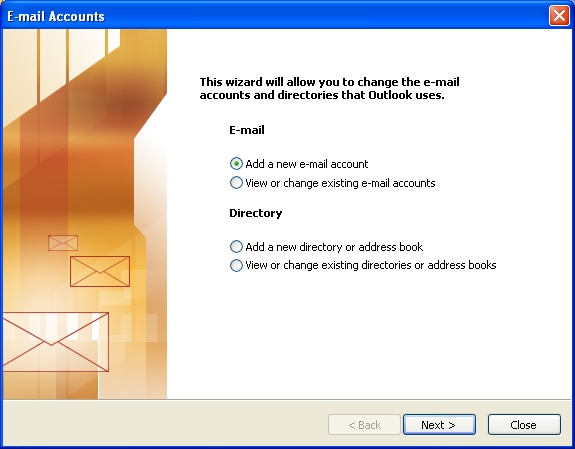
Here’s how to configure Outlook to manage the email from a webmail account. First, you need to tell Outlook to “add” a new email account to its list of duties. Go to Tools–>Email Accounts. Be sure the “add new account” radio button is selected and click “Next” (see figure 1).
A box like figure 2 will come up; yours may appear slightly different depending upon how many other email accounts Outlook is currently managing. Mine was empty, at first. Click on the “Add” button.
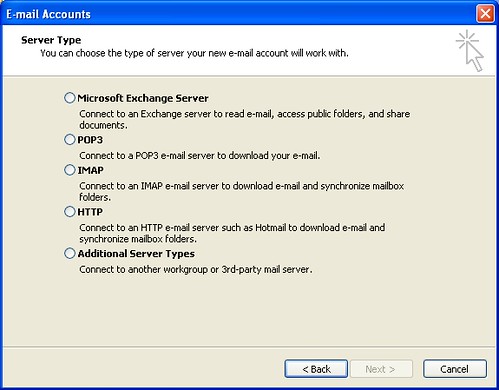
When you do, a box like Figure 2 will come up. Outlook wants to know what kind of an email server you’re trying to access information from. Refer to your own webhost’s documentation, but my webhost tells me that the mail server in my domain is of the type POP3. As I say, your mileage may vary, but for me (and for all email addresses on the heroesinrehab.ca domain), the correct answer at Figure 2 is to select the POP3 option and then click on the “Next” button.
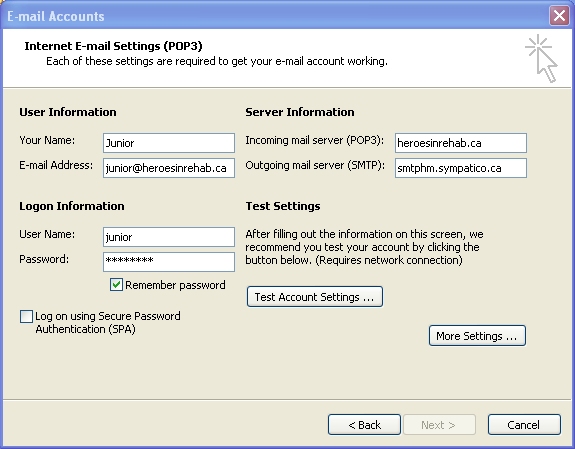
Outlook now needs to gather some information in order to proceed. Referring to Figure 3, enter the information as follows:
- in the “Your Name” box: your name as you want it to appear to the lucky recipient of your missive;
- in the email address box: the address of the account you’re trying to get Outlook to manage;
- incoming mail server (POP3): the name of the POP3 server (refer to your webhost docs – for heroesinrehab.ca addresses, it’s “heroesinrehab.ca”;
- outgoing mail server (SMTP): this is the name of your ISP’s outgoing mail robot. Refer to your ISP’s website/documentation, but for Sympatico, according to this page, it’s “smtphm.sympatico.ca”;
- user name: this is the user name for the account you’re managing -this was the part that was really confusing me yesterday, but think of this portion of the form as asking for the “receiving” half of the equation. In my case the user ID for the email I want Outlook to receive – at heroesinrehab.ca – is “junior”;
- password: I’ll give you three guesses. Nah, forget it, I’ll tell you. Input the password, again FOR THE ACCOUNT YOU’RE TRYING TO MANAGE (i.e. the password for my “junior(at)heroesinrehab.ca” account;
- remember password: selected (showing a little checkmark);
- Logon using Secure Password Authentication: not selected (for heroesinrehab.ca) – your mileage may vary, refer to your webhost’s documentation if configuring for a different domain.
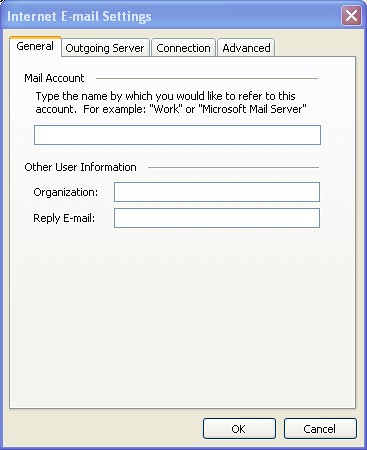
Once you’re satisfied that you’ve got all the info entered correctly in the box shown in figure 3, click on the “More Settings” button down in the bottom right of that box. When you do, a box like the one shown in figure 4 comes up. Here, on the “General” tab, Outlook is asking for some information about how to identify – to you – the email account that you’re configuring. In the box marked “Mail Account”, I typed something like “Junior’s HiR” so that I’d have a halfway decent chance of knowing what email account it referred to; pick something short and pithy for your own entry.
When that’s entered – before clicking on the “OK” button – click on the “Outgoing Server” tab. Remember the SMTP problem? Remember how you entered the “receiving” half of the equation in the last dialog box? Outlook still needs some information about the “sending” half of the puzzle.
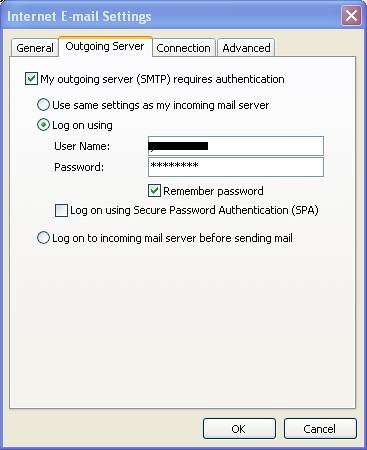
When you click on the “Outgoing Server” tab, the same box stays on screen, but now – instead of looking at the “General” tab shown in figure 4, you’ll be looking at the “Outgoing Server” tab depicted, you guessed it, in Figure 5. Complete the “Outgoing Server” tab as follows:
- Ensure the “My outgoing server (SMTP) requires authentication” box is checked;
- Select the “Log on Using” radio button – NOT the “Use same settings as my incoming mail server” button – and enter your ISP email account information in the boxes next to the button. For sympatico users, know that your “user name” is the ENTIRETY” of your sympatico email address, eg: “bob@sympatico.ca”. Your sympatico email password goes in the password box below that.
- Click on the “remember password” box (trust me, it’s easier that way).
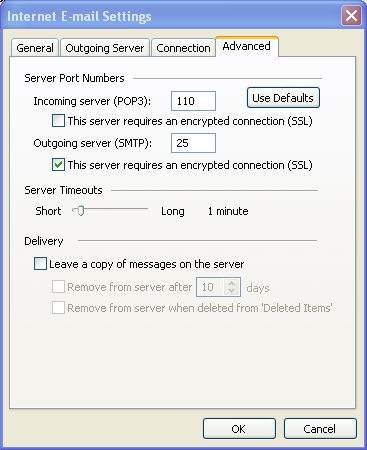
You’re not done yet, so DON’T click on “OK” just yet. Instead, click on the “Advanced” tab. Prepare to do some advanced stuff, amigo (it’s really not that hard).
You may need to check your webhost and ISP documentation to make sure that the port numbers for the respective mail servers you’ll be using (incoming and outgoing) are correct. I didn’t have to change the defaults, shown above. If you have a heroesinrehab.ca account and you’re using Sympatico.ca, you won’t have to change them either. If you’ve got a different ISP (outgoing mail server), you may need to check your ISP’s documentation (look in the “configuring email software” section, or somewhere similar) to find the correct port numbers. What I DID have to do, for Sympatico, was ensure that the “This server requires an encrypted connection (SSL)” box was selected.
Once that is all done, you can click on “OK”. The box containing the tabs in figures 4, 5 and 6 will close and you’ll be back at the box in figure 3. Click on the “Test Account Settings” button. Outlook will run a test and try sending a message to the mailbox you’re managing. If everything works properly, you’ll get a message dialog box from Outlook that the test was a success. Click the “close” button to get rid of that message box and don’t forget to click on the “Next” button at the bottom of figure 3 to save all your hard work. A box will come up congratulating you for being very smart for configuring the email address and inviting you to click the button marked “finish”. Do so. In a few minutes (depending on how often your version of Outlook is configured to check for new mail) you’ll find a message in your inbox marked “Microsoft Outlook Test Message”.
Yesterday, I missed one little checkmark – the last one in figure 6 above – and it resulted in three and a half hours of sheer frustration and some stunningly offensive new work in the field of applied profanity. This morning: one click of the mouse et la voila!
The moral of the story, I guess, is for me to remember that not all problems can be solved by brute force, offensive language and bull-headed stubbornness. Come to think of it, very few problems can be solved that way. What is called for instead is a clear head and a fresh approach.

I think it would have been faster to send a letter. ‘Cause all that stuff you put on your web note is too much for me to read…..Computers’ are just a fad!!!!